Hi Everyone,
In this tutorial we will learn the very basic of running a simple java program on windows machine
This blog is for the newbie in java who wants to start development in java.
1) Any JDK (recommended jdk1.6)
Note: to run a java program you only need JRE but to write and compile the java program you need JDK
if you do not have JDK download it from here JDK 1.6
You will get a list of downloads, Please download JDK for your operating system
if you are using 32-bit OS then select x86 from the list and if you are using 64-bit operating system download x64.
2) Any text Editor to write a java program (Notepad , notepad++)
1) Run the set up file after you have downloaded the JDK file
2) Choose the path where you want to install the JDK by default it is C:\Program Files\Java\jdk1.6.0_33
if you change this path please remember the path you have chosen for installation
3) Rest part is self - explanatory just click next and it will be installed on your machine
This part is very important to compile and run the java programs, most of the time if we do not set up environment variables properly we may end up in error while running the java programs.
Set the
If you do not set the
The
It is useful to set the
Value to add in path variable is where our JDK is installed
for e.g. C:\Program Files\Java\jdk1.6.0_33\bin
Windows XP
1) Open any text editor just copy paste the below code
2) It is a good practice to save the file with the name of the class in which your main method is
because when you compile this file our .class file will be generated with the name of class in which main method is present
So save the file with the name HelloWorld.java
For now create a folder name javaPrograms in C drive and save the source file in that folder
3) Now to run any java file we need to first compile it and then run
In java we use javac tool to compile the java programs, To compile
Bring up a shell, or "command," window. You can do this from the Start menu by choosing Command Prompt (Windows XP), or by choosing Run... and then entering
To compile your source file, change your current directory to the directory where your file is located. For example, if your source directory is javaPrograms on the
The compiler has generated a bytecode file,
The next figure shows what you should now see:

In this tutorial we will learn the very basic of running a simple java program on windows machine
This blog is for the newbie in java who wants to start development in java.
Pre-Requisite
1) Any JDK (recommended jdk1.6)
Note: to run a java program you only need JRE but to write and compile the java program you need JDK
if you do not have JDK download it from here JDK 1.6
You will get a list of downloads, Please download JDK for your operating system
if you are using 32-bit OS then select x86 from the list and if you are using 64-bit operating system download x64.
2) Any text Editor to write a java program (Notepad , notepad++)
Installation of JDK
1) Run the set up file after you have downloaded the JDK file
2) Choose the path where you want to install the JDK by default it is C:\Program Files\Java\jdk1.6.0_33
if you change this path please remember the path you have chosen for installation
3) Rest part is self - explanatory just click next and it will be installed on your machine
Setting Environment Variables
This part is very important to compile and run the java programs, most of the time if we do not set up environment variables properly we may end up in error while running the java programs.
PATH Variable:-
You can run Java applications just fine without setting thePATH environment variable. Or, you can optionally set it as a convenience.Set the
PATH environment variable if you want to be able to conveniently run the executables (javac.exe, java.exe, javadoc.exe, and so on) from any directory without having to type the full path of the command in command prompt.If you do not set the
PATH variable, you need to specify the full path to the executable every time you run it, such as:C:\Program Files\Java\jdk1.6.0_33\bin\javac HelloWorld.java
PATH environment variable is a series of directories separated by semicolons (;). Microsoft Windows looks for programs in the PATH directories in order, from left to right. You should have only one bin
directory for the JDK in the path at a time (those following the first
are ignored), so if one is already present, you can update that
particular entry.It is useful to set the
PATH environment variable permanently so it will persist after rebooting. To make a permanent change to the PATH variable, use the System icon in the Control Panel. The precise procedure varies depending on the version of Windows:Value to add in path variable is where our JDK is installed
for e.g. C:\Program Files\Java\jdk1.6.0_33\bin
Windows XP
- Select Start, select Control Panel. double click System, and select the Advanced tab.
- Click Environment Variables. In the section System Variables, find the
PATHenvironment variable and select it. Click Edit. If thePATHenvironment variable does not exist, clickNew. - In the Edit System Variable (or New System Variable) window, specify the value of the
PATHenvironment variable. Click OK. Close all remaining windows by clicking OK.
- From the desktop, right click the My Computer icon.
- Choose Properties from the context menu.
- Click the Advanced tab (Advanced system settings link in Vista).
- Click Environment Variables. In the section System Variables, find the
PATHenvironment variable and select it. Click Edit. If thePATHenvironment variable does not exist, clickNew. - In the Edit System Variable (or New System Variable) window, specify the value of the
PATHenvironment variable. Click OK. Close all remaining windows by clicking OK.
- From the desktop, right click the Computer icon.
- Choose Properties from the context menu.
- Click the Advanced system settings link.
- Click Environment Variables. In the section System Variables, find the
PATHenvironment variable and select it. Click Edit. If thePATHenvironment variable does not exist, clickNew. - In the Edit System Variable (or New System Variable) window, specify the value of the
PATHenvironment variable. Click OK. Close all remaining windows by clicking OK.
Hello World Program in Java
1) Open any text editor just copy paste the below code
/**
 * The HelloWorld class implements an application that
 * simply prints "Hello World!" to standard output.
 */
class HelloWorld {
    public static void main(String[] args) {
        System.out.println("Hello World! inside c"); // Display the string.
    }
}
Note: Type all code, commands, and file names exactly as shown. Both the compiler
(javac) and launcher (java) are case-sensitive, so you must capitalize
consistently.HelloWorldis not the same ashelloworldin java.
2) It is a good practice to save the file with the name of the class in which your main method is
because when you compile this file our .class file will be generated with the name of class in which main method is present
So save the file with the name HelloWorld.java
For now create a folder name javaPrograms in C drive and save the source file in that folder
3) Now to run any java file we need to first compile it and then run
Compile the Program
In java we use javac tool to compile the java programs, To compile
Bring up a shell, or "command," window. You can do this from the Start menu by choosing Command Prompt (Windows XP), or by choosing Run... and then entering
cmd. The shell window should look similar to
the following figure.
A shell window.
To compile your source file, change your current directory to the directory where your file is located. For example, if your source directory is javaPrograms on the
C drive, type the following command at the prompt and press Enter:cd C:\javaPrograms
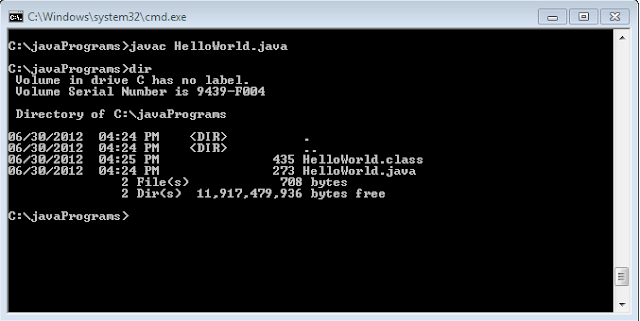
Now you are ready to compile. At the prompt, type the following command and press Enter.
javac HelloWorld.java
HelloWorld.class. At the prompt, type dir to see the new file that was generated, as shown in
the following figure.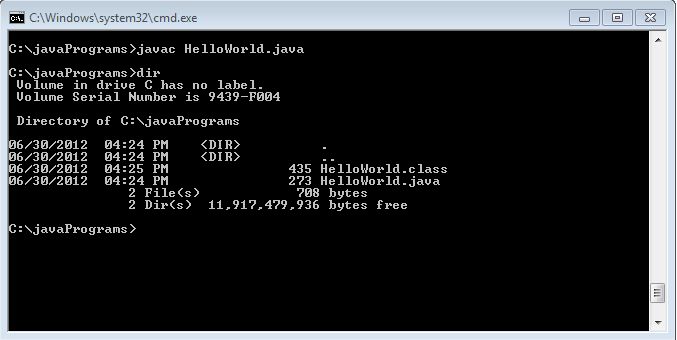
Run the Program
In the same directory, enter the following command at the prompt:java HelloWorld

The program prints "Hello World!" to the screen.